|
You know that part in Disney's Ratatouille when the food critic takes a bite of the ratatouille and gets flashed back in time to his childhood? I think I was having one of those moments today as I savoring bite after bite (after bite) ;) of these cookies. I seriously cannot stop eating these! Neither can my sweet daughter... I had to keep telling her today to stop sneaking them because I needed to snap some pictures still! These taste so incredible, I'm so pleased how they turned out! (It was my first attempt too! Hooray!) I adapted them from a recipe by Better Home & Gardens. It used to be my go-to recipe back in college during my gluten days. All I can remember is my roommate would make these for boys she wanted to impress...Needless to say, it always got their attention! Ha ha. Anyways, I learned some great tips while rolling out gluten free dough so be sure to check that out too. AMAZING Gluten Free Sugar Cookies (Gluten Free, Can be Dairy Free) Adapted by jalene from a Better Home & Garden Recipe Makes about 24-36 cookies, depending on how big you make them Ingredients:
 Directions:
Roll out! I learned some great tricks that will make rolling out your dough super easy.
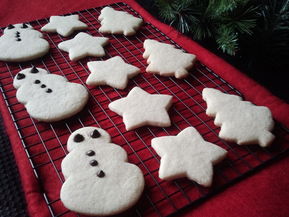
TO COOK: Bake for 8-10 minutes. I like my cookies before they start to turn golden so I do the 8 but when they get a little brown around the edges, they're really good too! We don't use food coloring so we got creative with our decorations. See below: Decorating with Audrey... Meet Audrey's 2 best pals: Dolly and Frosty! Since the moment I pulled the snowman out of my Christmas decorations box, it was love at first site for Audrey. She carries him around EVERYWHERE and they do most everything together! She'll talk to him, show him around, make him watch her eat... Cute huh. In fact, every snowman Audrey sees is called "Frosty" and she talks to them too. So when we made these cookies today she couldn't even stand it! She called them "my cookie monster frosties."  She absolutely LOVED helping put the chocolate chips on these! We used Gluten Free and Dairy Free chocolate chips (2 big for the eyes, and 3 mini for the buttons) Of course 2 year olds have their own rules. This is Audrey's cookie. Not bad! She was eating one chocolate chip for every one she put on the cookie but at least she had some holiday fun with mom. Warning: I'm supposed to tell you (by orders of the Dr. aka my husband) that these are only to be eaten sparingly. They're not the healthiest cookie ever made so try not to eat them everyday! ;) One of our favorite products:
7 Comments
June Tassie
11/23/2014 07:52:11 am
Dear Jalene, I have recently become gluten intolerant. It took me awhile to figure it out. At first I felt so deprived. But then I found your page and tried a few recipes. This will be my first holidays with the new diet plan, so I am going to try a few of your holiday desserts. It has been so nice reading your recipes. It is like talking with a friend. I feel like you could be my own daughter, or maybe grand daughter since I'm not as young as I once was. Thank you for all that you have done and for sharing with us. June, thank you so much for your comment. That was so nice of you to say! You know I post these recipes to help others but often wonder if they ever do... so thank you for letting me know. Good luck with all your holiday eats! We've been gf for 6 holidays now, I promise it gets easier. ;) let me know if you need any help! My email is at the top of this page.
Thank you so much for posting this recipe. Our eldest daughter has just recently been diagnosed with Celiac disease and as you know has to be on the gluten-free journey and is also lactose intolerant. We are both hobby bakers and manuevering through this maze of GF flours has been a learning experience. I am looking forward to trying your cookie recipe and trust that it will not only taste good, have good texture, but also keep its shape...If I do not loose your link will let you know what I think. Thanks again!!!!
Toni
10/26/2017 08:05:29 pm
Hello! Thanks for your comment, I haven't tried that. This recipe is pretty particular so I'm not sure how a substitution would do. The coconut oil may give them a greasy dryness and make them hard to roll out as the oil solidifies in the fridge. I just don't know. So if you tried it, it would be an experiment. Sorry! Hope that helps a little. Good luck!
Toni
10/27/2017 11:01:03 am
Thanks for responding! I used all earth balance as my son can not handle the crisco that I had (I didn't have a better replacement on hand), replaced xanthum gum with guar gum as he can not have corn, used maple sugar, and used a sub flavoring as well. They turned out just fine, maybe a little dry so next time I wonder if adding an egg wd help...Anyways thanks so much for posting all these recipies :) Leave a Reply. |

jalenewife of a holistic doctor & 
Recipe Categories:
All
Search our Website:

Archives
August 2020
|
 RSS Feed